Search This Blog

Tuesday, October 29, 2013

Extend your Wi-Fi network throughout the house

                                         Extending a Wi-Fi network can be as easy as playing with cardboard and tape, or as difficult as rewiring your house. It all depends how big a boost you need, and how much time and money you're willing to devote to the task.
Here are three ways to increase your signal's range.

Boosters

You know those little antennas that screw onto your router? You can improve the signal by replacing them with bigger antennas, or more directional ones.
You can also improve the existing antenna, making it directional. All you need is a few minutes and some common household materials. See Extend Your Wi-Fi Range With a Parabolic Reflectorfor detailed instructions.
If you're not the do-it-yourself type, or if you need to boost the signal in all directions, you can buy a generic antenna for a few dollars. I've seen this same antenna (see image to the right) sold under different brand names--priced from $2 to $7. And yes, I've tried it and it helps…a bit.
For a more powerful boost than either of those, try the directionalTP-Link TL-ANT2409A. You can get it for $25 if you shop around.

Extenders

You plug one of these devices, also called repeaters, into a wall socket as far from the router as you can get and still receive a good signal. The extender picks up the signal and rebroadcasts it.
In general, I find these more effective than boosters. But they're also more expensive, and are trickier to set up, since you have to find the best location and connect them to the network.
The best one I've tested (and I haven't tested all that many) was theAmped Wireless REC10. If you look around, you can buy one for $70.In general, I find these more effective than boosters. But they're also more expensive, and are trickier to set up, since you have to find the best location and connect them to the network.

HomePlug

I used to be a fan of this technology, which carries network data over your house's electric wiring. The adapters are basically power bricks with Ethernet ports. Some also have Wi-Fi Antennas.
You won't have much trouble adding HomePlug to your network--you just plug it in and it works…if it works.
All sorts of things can interfere with HomePlug signals--wiring, the location of the washing machine, the type of light bulbs you use.
I used HomePlug happily for years. It didn't give me Ethernet speed or even 802.11n speed, but it was faster than my Internet connection and that was all that I needed. Then it just stopped working.


Thursday, October 3, 2013

Remote Network Access: Objectives and Architecture

In the this mini-series of posts, I am going to diverge from my usual System Center-only focus to take a fresh look at deploying a Microsoft Remote Network Access solution. First, we'll get you online and working using SSTP, and then extend this base implementation with Network Access protection before finally coming back a little later and elevating these SSTP servers to Direct Access.

Why Remote Network Access?

So why I am doing this? As we build out solutions for System Center, we need a foundation from which to work, and within the latest versions of Configuration Manager we have the ability to integrate with the Windows Network Access Protection and manage our off-site computers with a dial out approach over Direct Access. Also, in the new R2 releases we can integrate both our Certificate Servers (Certificate Authority – CAs) and we finally have the ability to distribute VPN Profiles to our end users. Therefore, I am considering this miniseries as a foundation for illustrating these features and abilities in later posts.
I am building this solution out using the recently published RTM builds of Windows Server 2012 R2, but almost everything I will cover in this series will work from 2008 R2, with some minor adjustments and wizard changes.

Architecture

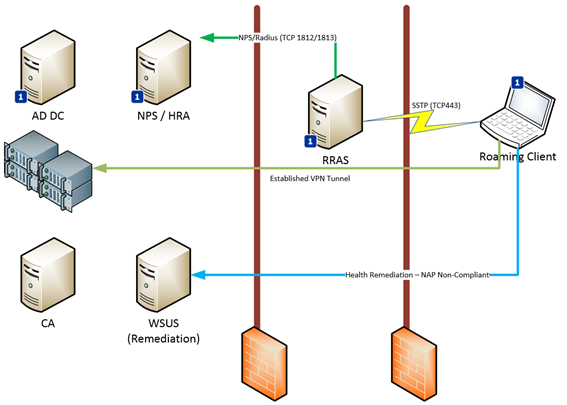
The environment which we will use for the scenarios is illustrated in the graphic below, showing our client establishing a connection with the RRAS server over TCP443 or what you might better recognize as the HTTPS port. SSTP utilizes this same supporting environment, including the SSL certificates used to protect the tunnel.
I have tagged a number of the components with a  to indicate the initial systems which are engaged in the basic SSTP implementation, including the Network Policy Server (otherwise known as RADIUS), which is used to check the client's authorization to proceed with establishing the requested tunnel.
The remaining servers are added to the scenario as we enable the NAP services, including the Certification Authority, and as an example, a simple Windows Update Server to offer simple remediation to non-compliant clients.

Each of the servers are responsible for different roles in the overall solution. To get a brief understanding of what these are, let's take a quick look at their primary functions.
  • NPS Server – This hosts the Network Policy Services and Network Access Protection services. This server can also be referred to as the Radius Server. When we extend the solution with support for Network Access Protection, we will add a second role to this server called Health Replication Authority (HRA), which will connect to our Certificate Server to request and Issue health certificates
  • SSTP Server – This server hosts the actual Routing and Remote access installation. It will be configured to primarily offer SSTP-only tunnels, and it will connect to the NPS server for authentication and accounting (storing auditing) information, with the purpose of determining if the clients are indeed permitted to establish the tunnels
  • CA Servers  These host PKI certificate templates and issues certificates based on these templates to our systems. It is also responsible for issuing the Health Certificates via the Health Responsibility Authority. We will need to actually create the templates for these Health Certificates as part of the deployment.
  • Client Computers – These are domain-joined machines that will subscribe to the new SSTP service that we are implementing. SSTP is supported from Windows 7 and newer versions of the client. Non-domain-joined machines can of course work with SSTP, but for the scope of this mini-series I am focusing on domain-joined systems.

We now have the background and an idea of how the different servers will be used. Our next objective will be to implement this solution. Now would be a great time to get your environment ready and spin up some servers for the jobs we are about to face.

How to back up the registry in server

How to step by step back up of registry in server 2008, if you are editing in windows registry make sure you have backup of registry. If any problem occurs you can safely restore your registry. You can backup Windows 2000, Windows XP, Windows Server 2003, Windows Vista, and Windows Server 2008 by this method. Before create a backup you should login with administrator.

Follow these steps to backup registry:-

 1.      Click Start, and then click Run.

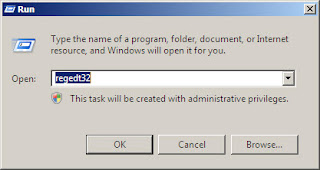
 2.      In the Open box, type "regedt32", and then click ok.


 3.      On the Registry menu, click Export.

 
4.      In the Save inbox, select a location in which to save the .reg file, type a file name in the File name box, and then click Save.

Tuesday, October 1, 2013

How to change the listening port for Remote Desktop

Remote desktop listening port 3389 is working by default in server 2008. You can change and define custom listening port for remote desktop. You can define port number between 1025 and 65535.

How to change the Remote Desktop listening port on Windows Server 2008?

You can change remote desktop listening port on server 2003, windows xp and windows 7 by same method.


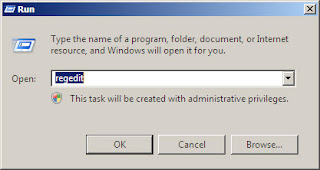
  1. Click on Start and type “regedit” or you can press windows key + R to lunch run and type “regedit”  and press enter  Registry Editor will open.
 
  1. Locate and then click the following registry subkey:
HKEY_LOCAL_MACHINE\System\CurrentControlSet\Control\TerminalServer\WinStations\RDP-Tcp\PortNumber
  1. Select PortNumber and double click on it then click Decimal.
  2. Find the "PortNumber" subkey and notice the value of 00000D3D, hex for (3389)
  3. Type the new port number, and then click OK.
  4. Quit Registry Editor.
  5. Restart the computer.
Now you can check form other computer start Remote Desktop Connection form start -> all programs -> accessories -> remote desktop connection.

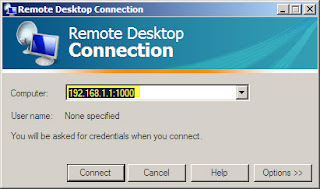
Now type ip address with port of server (IP address:Custom port).


Troubleshooting 

Note When you try to connect to this computer by using the Remote Desktop connection, you must type the new port. Maybe you have to set the firewall to allow the new port number before you connect to this computer by using the Remote Desktop connection.


If you got this message “The remote computer requires Network Level Authentication, which your computer does not support. For assistance, contact your system administrator or technical support”